Your Digital Safety Net: A Senior’s Guide to Backing Up and Restoring Devices
Ever notice how your computer never loses the stuff you actually want it to lose? Like that blurry photo of your elbow you accidentally snapped in 2014—it’ll be around forever.
But the moment you really care about something—like your granddaughter’s graduation video or the secret family meatloaf recipe—that’s when your computer decides to pull a disappearing act worthy of Houdini.
And poof! Years of memories, documents, and messages could vanish faster than you can say, “Wait, where did my files go?”
That’s why backups matter. Think of them as your digital life insurance policy—except instead of helping your heirs, it saves you from banging your head on the desk and muttering things you hope the grandkids don’t overhear.
The best part? It’s way easier than it sounds, and I’ll walk you through it, step by step, so you can protect your memories without needing a computer science degree—or a stiff drink.
Think of it like making extra copies of your house keys or important papers and stashing them in a few different, secure places. That’s what backing up your devices is all about.
We’re going to walk through this together, step by simple step, so you can enjoy your tech without that nagging “what if” in the back of your mind.
Demystifying Backup: What is it, Really?
Let’s clear the fog here: a backup is just a fancy term for “extra copies.” That’s it.
If you’ve ever photocopied a recipe card or made a spare key in case your original goes missing, congratulations—you already understand backups. The only difference is we’re doing it with your digital treasures instead of the key to Aunt Edna’s house.
Think of it like this: your computer is a teenager’s bedroom. Messy, unpredictable, and always one bad decision away from disaster.
A backup is you swooping in with a magic duplicate of everything important—photos, documents, even that hilarious text from your niece—so no matter what chaos happens, you’ve got a safe, clean copy tucked away.
What kind of “stuff” are we talking about? Primarily, anything that would be difficult or impossible to replace. This includes:
Precious Photos & Videos: The irreplaceable snapshots of family vacations, holidays, and everyday joys.
Important Documents: Financial records, medical histories, wills, tax documents, or family recipes passed down through generations.
Contacts & Calendars: All those phone numbers and appointments you rely on every day.
Health Records: Increasingly, these are digital and need careful preservation.
Why is this so important for seniors?
Well, beyond the emotional value of memories, a lower digital literacy can make it harder for older adults to navigate digital threats and recover from data loss.
A solid backup plan means you’re prepared, even if technology decides to throw a curveball.
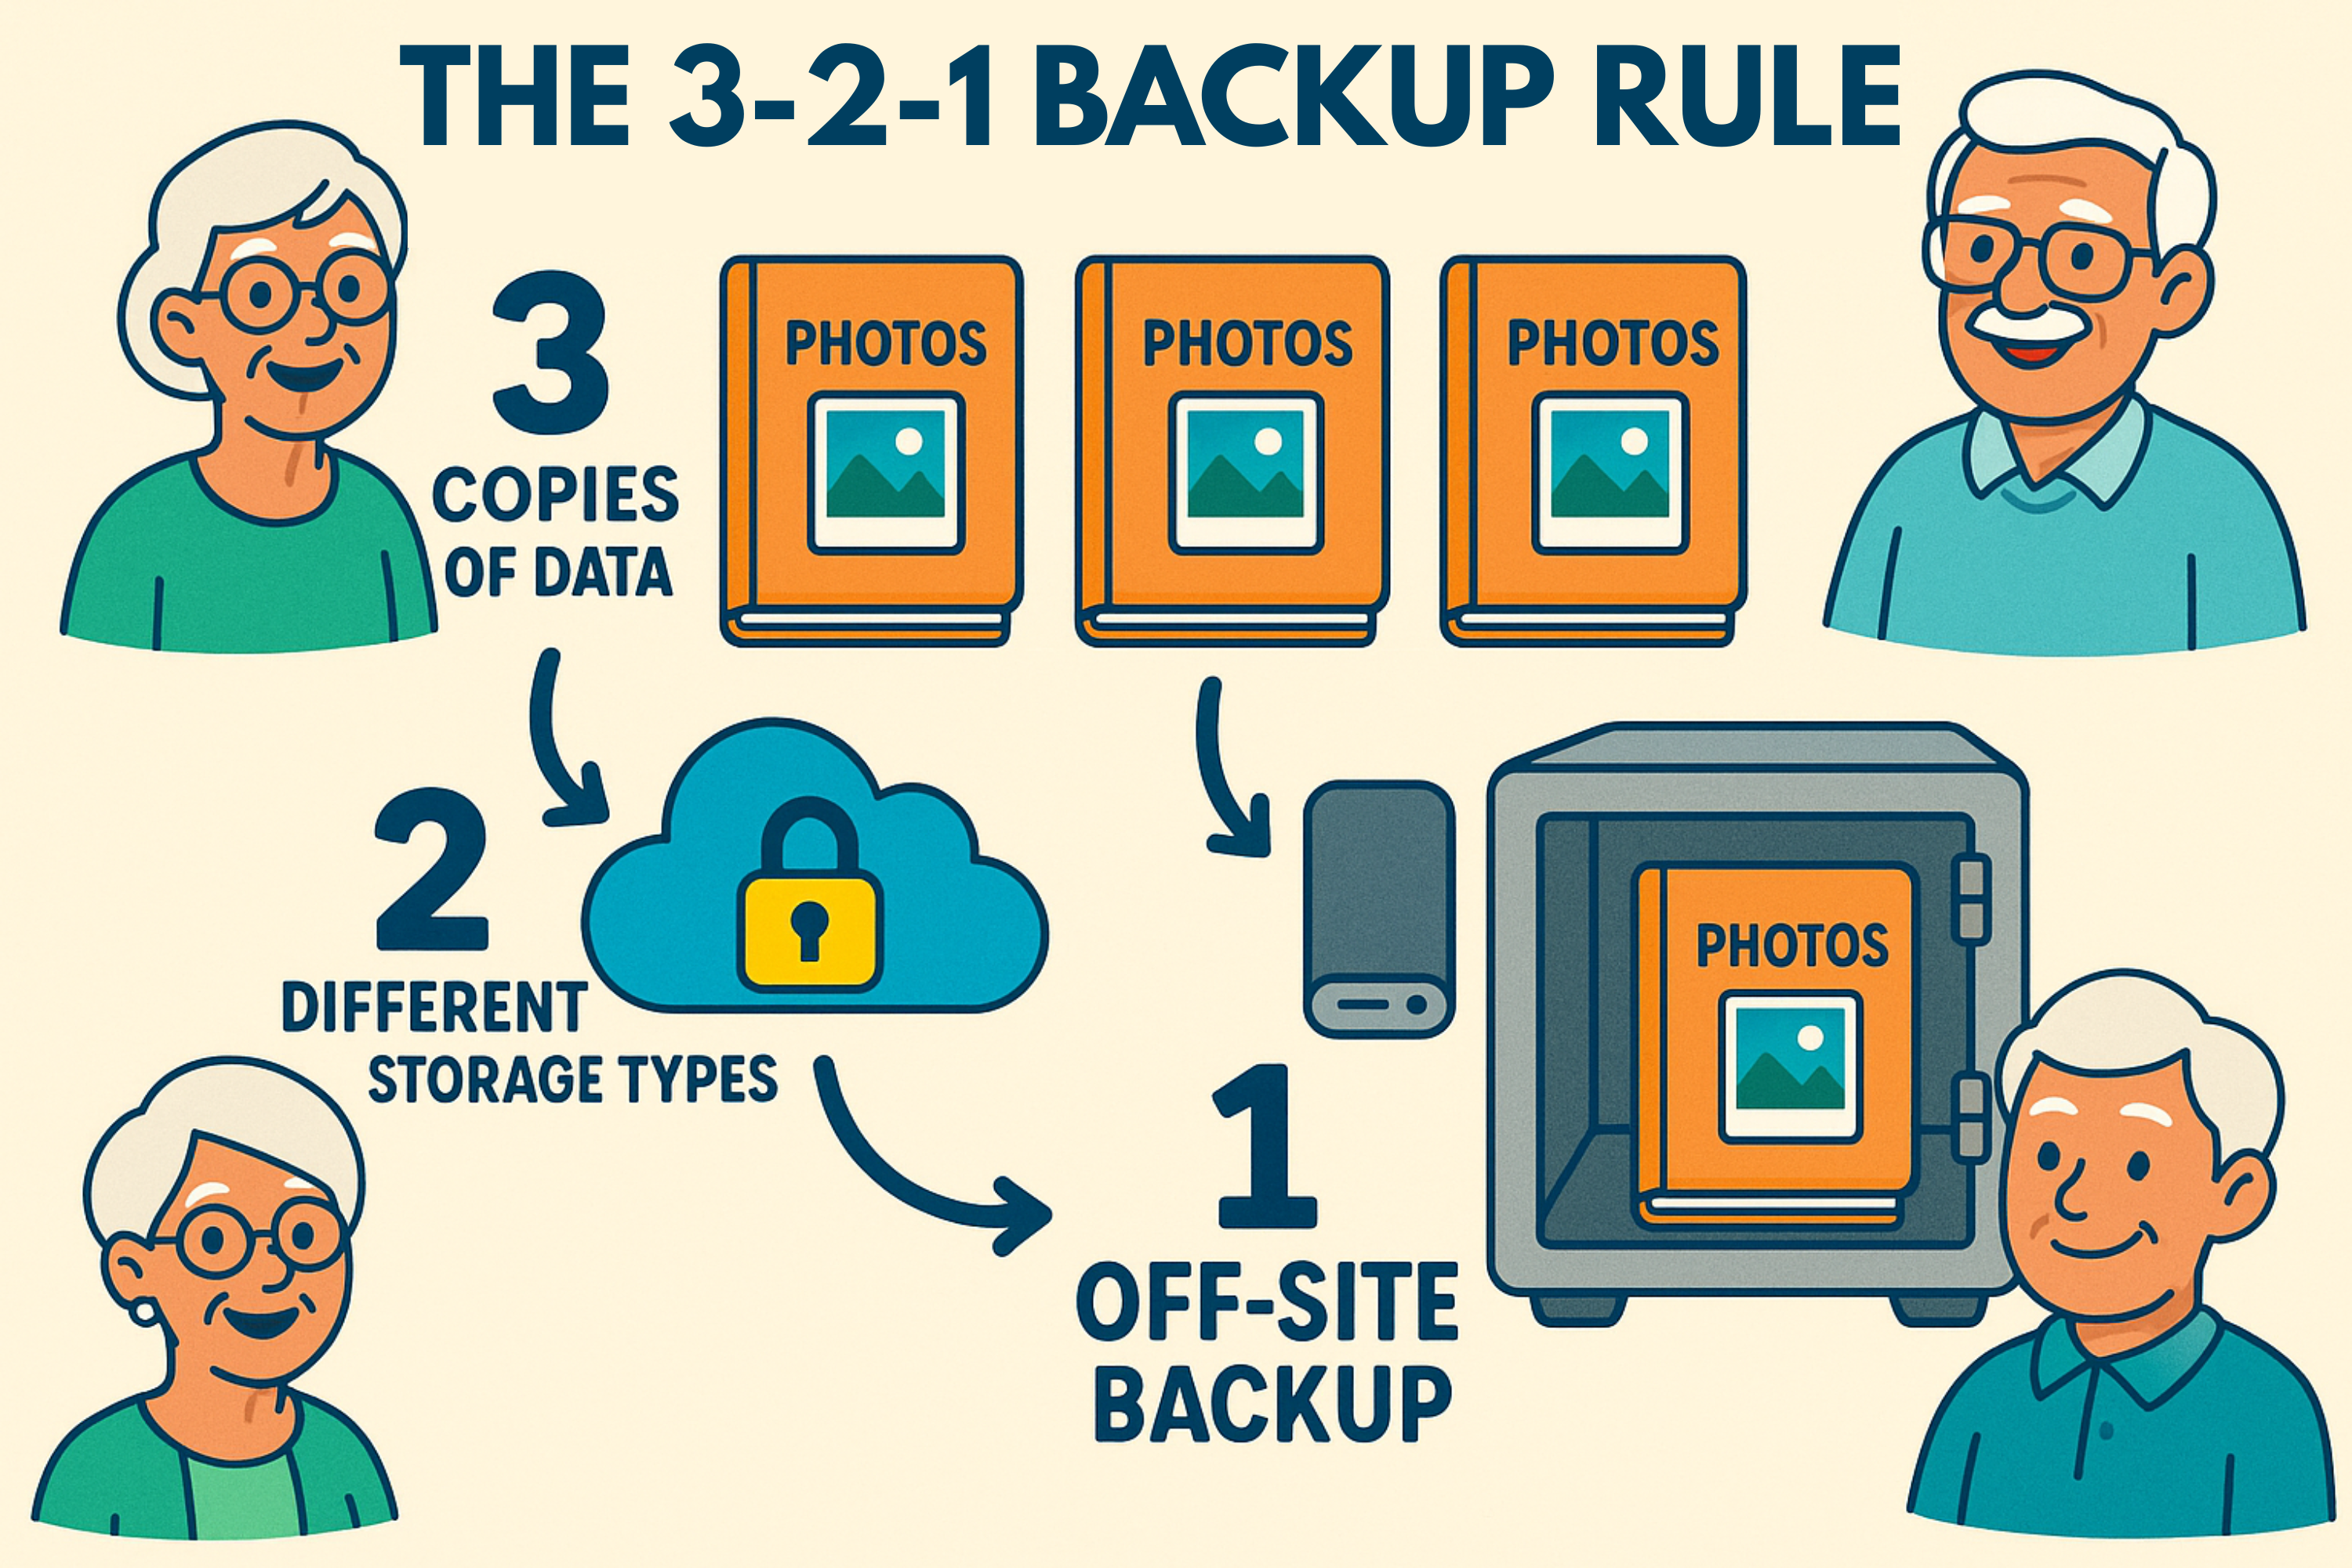
The Golden Rule of Digital Safety: The 3-2-1 Backup Strategy for Seniors
When it comes to keeping your digital life truly safe, experts recommend a simple, powerful strategy called the “3-2-1 Rule.”
It’s not a secret handshake, just a common-sense approach that protects you from almost anything life (or your computer) can throw at you.
The 3-2-1 rule ensures your treasured memories and files are protected by smart, redundant backups — your digital safety net.
Here’s how it works, translated into plain English:
Three Copies of Everything: Don’t just have one copy. You need your original files, plus at least two more copies. Think of it like having the original family photo, a copy in an album, and another copy in a safe deposit box.
Two Different Types of Media: These two copies shouldn’t be on the same kind of device. For example, if your original is on your computer, one copy might be on an external hard drive, and the other on a cloud service (more on these in a moment). This protects you if one type of storage fails.
One Off-Site: At least one of those copies should be stored in a different physical location. Why? Because if your house experiences a fire, flood, or even a determined squirrel invasion, you don’t want all your backups going up in smoke with your original computer. A cloud service is perfect for this, or you could keep a USB drive at a trusted friend’s house.
Following the 3-2-1 rule means your cherished memories and crucial documents are protected against almost any digital mishap—from a spilled cup of tea to a rogue computer virus.
Your Backup Options: Choosing What’s Right For You (Pros & Cons, Simplified)
Just like there’s more than one way to bake a cake, there’s more than one way to back up your files.
The best method for you depends on what you’re backing up, how often, and your comfort level with technology. Let’s look at the main contenders.
Side-by-side comparison clarifies which backup method suits your needs—balancing convenience, privacy, and peace of mind.
External Hard Drives / USB Sticks
These are physical devices you plug into your computer. Think of them as a big, fancy USB stick with lots of storage space, or a digital shoebox for your files.
Pros:
One-Time Cost: You buy it once, and it’s yours. No monthly fees.
Offline and Private: Once unplugged, your data is completely offline, away from internet snoops or hackers. You have complete control.
Hands-On Control: You can see your files, drag and drop them, and know exactly where they are.
No Internet Needed (for access): You don’t need Wi-Fi to access your backup, just your computer.
Cons:
Can Be Lost or Damaged: Like any physical object, they can break, get misplaced, or be stolen.
Requires Manual Updates: Unless you set up special software, you’ll need to remember to plug it in and copy new files regularly.
Not Off-Site: If kept in the same location as your device, it doesn’t protect against local disasters (like that squirrel invasion we mentioned).
Simple Guide: Plugging in and copying files on a PC (Mac is similar):
Plug it in: Connect the external drive’s cable to a USB port on your computer.
Open “File Explorer” (Windows) or “Finder” (Mac): This is where you see your computer’s files.
Find your drive: It will usually appear as a new drive letter (like “D:” or “E:”) or under “Locations” on a Mac.
Drag and Drop: Click on the folders you want to back up (like “Pictures” or “Documents”) on your computer and drag them over to your external drive’s folder.
Safely Eject: When done, right-click on the drive’s icon in File Explorer/Finder and choose “Eject” or “Safely Remove Hardware.” This prevents data corruption.
Cloud Backup Services
This is where your files are stored on secure servers maintained by companies like Google, Apple, Microsoft, or others. It’s like having a digital safe deposit box in the sky.
Pros:
Automatic: Once set up, many cloud services can back up your files automatically in the background. Set it and forget it!
Accessible Anywhere: You can access your files from any device with an internet connection, anywhere in the world.
Safe from Local Damage/Theft: If your computer or phone is lost or damaged, your cloud backup is safe and sound. It’s automatically off-site.
Cons:
Subscription Cost: While many offer free basic storage, you usually pay a monthly or annual fee for more space.
Requires Internet: You need an active internet connection to back up or restore files.
Critical Privacy Considerations: This is the big one, and it’s where many services differ significantly. We’ll dive into this next.
Big Tech vs. Your Privacy: Making an Informed Choice
When you store your precious digital life in the “cloud,” you’re basically handing over the keys to your digital house.
But here’s the thing… some companies treat those keys like they’re guarding Fort Knox.
Others…well, let’s just say you’d get more privacy yelling your Social Security number across a crowded bingo hall.
Not all clouds are created equal. Some are sturdy, locked vaults. Others are more like those leaky sheds you buy on clearance at the hardware store—you technically have storage, but you’re not sure if it’ll survive the next storm.
That’s why choosing the right cloud service isn’t just about convenience—it’s about making sure your family photos don’t end up as test material for an AI that thinks your grandkids are part of a potato catalog.
This is a big concern for 34% of people aged 50 and older, who cite privacy worries as a top barrier to adopting new technology.
See why Proton Drive’s end-to-end encryption offers seniors unmatched confidence in protecting treasured data against Big Tech privacy trade-offs.
iCloud & Google Photos/Drive: The Convenience Factor
These services are incredibly popular because they’re often built right into your iPhone or Android phone, making them super convenient. They usually offer a small amount of free storage, which is great for getting started.
Pros:
Convenient and Integrated: Seamlessly works with your Apple or Android devices.
Often Free Basic Storage: You get a few gigabytes for free, enough for some photos and documents.
Easy to Use: Designed for simplicity, especially for photos.
Cons:
Privacy Concerns: While these companies have security measures, their business models often rely on collecting data. This means they might scan your photos or files for various purposes, like improving their services or even for targeted advertising. You have less control over how your data is used.
Less Control: Your data is technically accessible by the company, even if they promise not to look at it.
Simply put: While easy, these services might be using your data in ways you don’t expect. If you’re okay with a trade-off between ultimate privacy and extreme convenience, they can be a good starting point for less sensitive data.
Proton Drive: The Privacy-First Alternative
If privacy is a top concern—especially for sensitive documents, health records, or deeply personal photos—then a service like Proton Drive offers a much stronger digital fortress.
Unique Value:
End-to-End Encryption: This is a fancy term for a simple idea: Your files are scrambled into unreadable code before they even leave your device, and they stay scrambled until they reach the person you’re sharing them with (or until you open them yourself). Even Proton, the company providing the service, cannot read your files. This is a game-changer for privacy.
Strong Privacy Policy: Proton is based in Switzerland, a country known for its strong privacy laws. Their business model is built around user privacy, not data collection.
True Peace of Mind: For seniors worried about online scams, identity theft, or simply having their personal information shared, Proton Drive offers a level of security that Big Tech companies often don’t. It directly addresses the fear of making mistakes or being defrauded, offering actionable, reassuring steps.
Why it’s better for seniors concerned about privacy: It offers a robust answer to those underlying anxieties about who has access to your most personal information. If you’re serious about protecting your digital privacy, Proton Drive is an excellent choice.
Now let’s get down to the nitty-gritty. While the principles are the same, the steps for backing up vary slightly depending on your device. Choose your adventure!
iPhone/iPad (iCloud)
For Apple devices, iCloud is your built-in digital safety net.
Automatic iCloud Backup setup:
Open Settings: Tap the grey gear icon on your home screen.
Tap your name: At the very top, tap on your name and picture.
Tap “iCloud”: Scroll down a bit and tap “iCloud.”
Tap “iCloud Backup”: Turn the switch to green if it’s not already.
Tap “Back Up Now”: To do an immediate backup. After this, your device will automatically back up when it’s connected to power, Wi-Fi, and locked.
Backing up to a computer (Finder/iTunes):
Connect your device: Plug your iPhone/iPad into your computer using a USB cable.
Open Finder (Mac) or iTunes (Windows):
Mac: Open a Finder window, and your device should appear in the sidebar.
Windows: Open iTunes (if you don’t have it, you can download it from Apple). Your device icon will appear in the upper left.
Select your device: Click on your iPhone/iPad.
Choose “Back up now”: In the “Backups” section, select “Back up now.” You can also choose to encrypt your backup for extra security.
Cleaning up photos on iPhone:
iPhones can accumulate a mountain of photos! To manage them:
Review your photos: Open the Photos app and scroll through your library.
Delete duplicates: iOS has gotten smarter! Newer iPhones (iOS 16 and later) have a “Duplicates” album under “Utilities” in the Photos app, letting you quickly merge or delete extra copies [9].
Use “Hidden” and “Recently Deleted”: If you want to temporarily remove photos from your main library without permanently deleting them, use the “Hide” option. Photos you delete go into “Recently Deleted” for 30 days before they’re gone forever.
Android (Google One / Samsung Cloud / Smart Switch)
Android devices often use Google’s services for backup, and Samsung phones have their own helpful tools.
Automatic Google Backup setup:
Open Settings: Tap the gear icon.
Tap “Google”: Then tap “Backup.”
Turn on “Google One backup”: If it’s not already, turn this switch to green.
Tap “Back up now”: To start an immediate backup. Google will automatically back up your apps, call history, device settings, contacts, and SMS messages. Your photos will be handled separately by Google Photos.
Samsung-specific backup via Samsung Cloud and Smart Switch:
Samsung Cloud:
Open Settings > Accounts and backup > Samsung Cloud.
Here you can choose what to back up (e.g., phone, messages, contacts) and initiate a backup.
Smart Switch (for transferring to a new Samsung phone or PC backup):
On your new phone: During setup, Smart Switch guides you through transferring data from your old phone (even an iPhone!).
For PC backup: Download the Smart Switch app to your computer from Samsung’s website. Connect your phone, open the app, and follow the instructions to back up to your PC. This is especially good for full device backups.
Restoring apps and data on a new Android device:
When you set up a new Android phone, it will usually ask if you want to restore from a backup. Just log in with your Google account, and it will present you with recent backups to choose from. It’s surprisingly straightforward!
PC (Windows Backup / External Drive)
Windows offers some built-in tools for backup, plus the good old drag-and-drop method to an external drive.
Using Windows built-in backup (Windows 10/11):
Connect an external drive: Plug in an external hard drive.
Open Settings: Click the Start button, then the gear icon.
Go to “Update & Security” (Windows 10) or “System > Storage” (Windows 11):
Windows 10: Click “Backup” on the left.
Windows 11: Click “Advanced storage settings” then “Backup options.”
Click “Add a drive”: Select your external hard drive.
Turn on “Automatically back up my files”: Windows will now back up your personal files periodically.
Manual backup to external drive (drag-and-drop method):
This is the simplest way. As covered earlier, just plug in your external drive, open File Explorer, and drag your important folders (like “Documents,” “Pictures,” “Videos”) from your computer to the external drive. Make sure to do this regularly for new files!
Mac (Time Machine / External Drive)
Apple’s Time Machine is a fantastic, almost “set it and forget it” backup solution for Mac users.
Using Time Machine:
Connect an external drive: Get an external hard drive with enough space (at least as much as your Mac’s storage).
Time Machine asks you: The first time you plug in a new drive, your Mac will usually ask if you want to use it with Time Machine. Say “Yes!”
If it doesn’t ask:
Open System Settings (macOS Ventura or later) or System Preferences (older macOS): Click the Apple menu in the top left, then “System Settings” or “System Preferences.”
Click “Add Backup Disk” or “Select Disk”: Choose your external drive.
Turn on “Back Up Automatically”: Time Machine will now automatically back up your Mac every hour, keeping daily and weekly backups for a certain period.
Manual backup to external drive:
Just like with a PC, you can always drag and drop files directly from Finder on your Mac to an external hard drive for a manual copy. This is a good way to supplement Time Machine for specific, very important files.
Restoring Your Digital Life: When You Need Your Backup
The whole point of having a digital safety net is knowing it’s there for you when disaster strikes. Restoring your files might sound intimidating, but it’s often simpler than you think. Think of it as opening that digital safe deposit box and retrieving your valuable items.
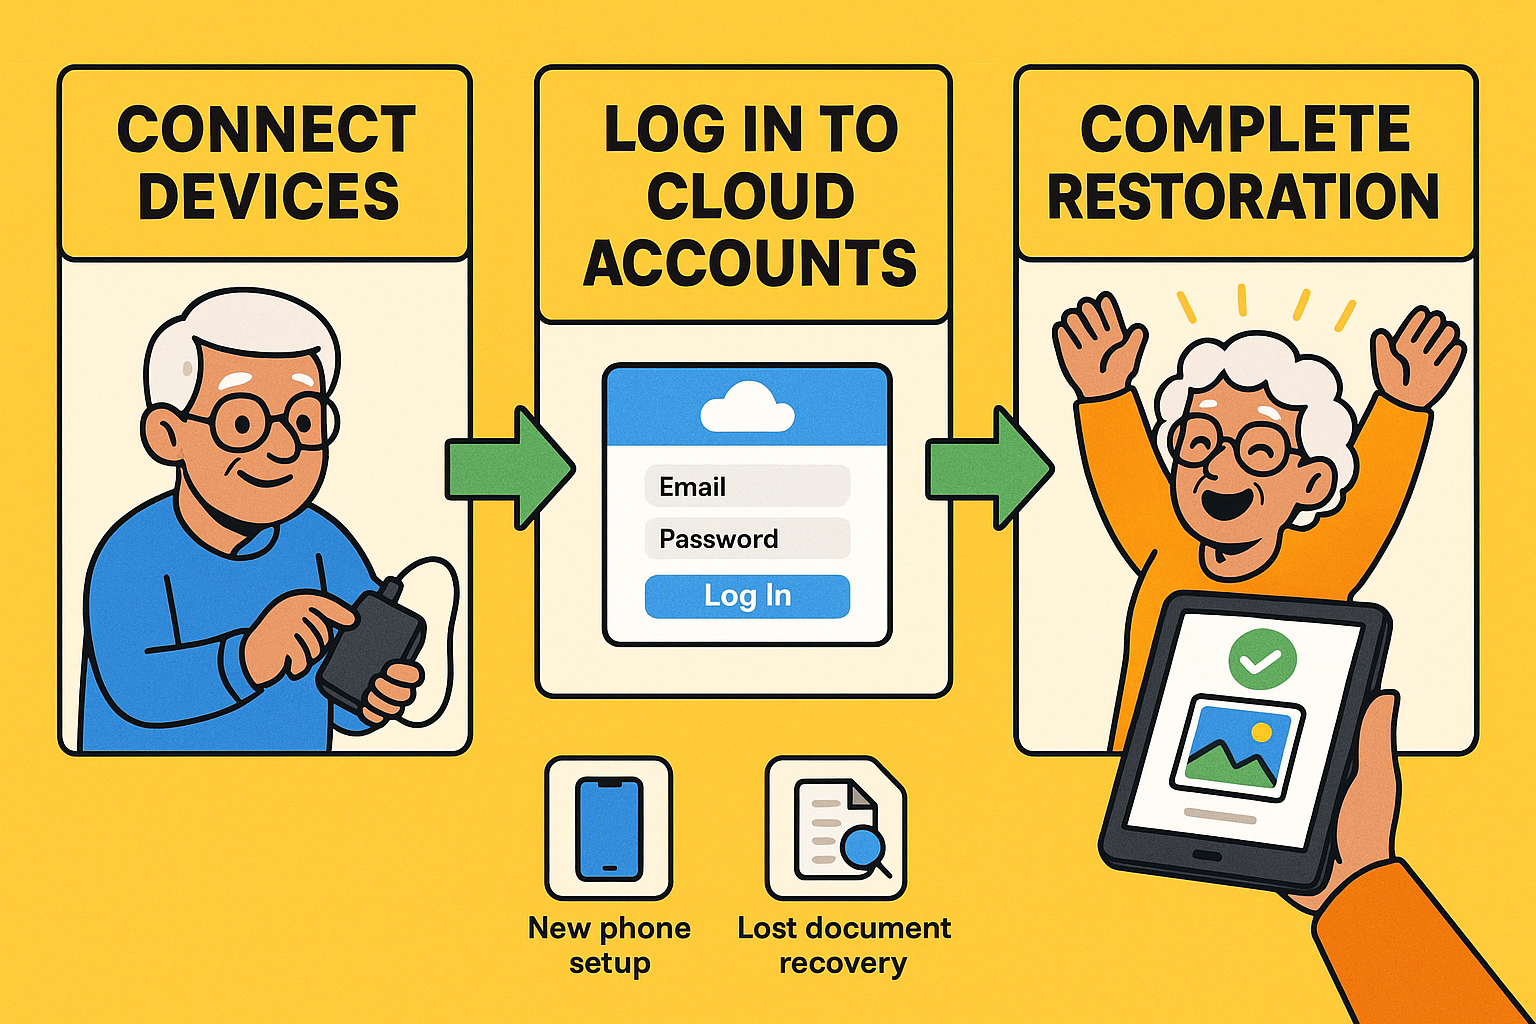
Follow this easy roadmap to restore your important files and memories — your digital safety net at work when it matters most.
General principles of restoration:
For Cloud Backups (iCloud, Google, Proton Drive): You usually just log in to your account on a new device or a restored device. Your files will then begin to download, or you can access them directly from the cloud service.
For External Drives (PC/Mac): You connect the external drive to your computer, open it, and then simply drag the backed-up files back to their original folders on your computer.
Scenario-based restoration:
“Setting up a new phone”: When you get a new iPhone or Android, the setup process will almost always ask if you want to restore from a backup. Just follow the on-screen prompts, choose your most recent backup, and let the magic happen.
“Recovering a lost document”: If you accidentally delete a file from your computer that was on an external drive, just plug in that drive, find the document in your backup folder, and copy it back to your computer.
“Computer crashed”: If your computer completely gives up the ghost, you’d get a new one, then connect your external backup drive or log into your cloud service to retrieve all your files.
The key takeaway? Your safety net is there for you, and retrieving your files is often just a matter of connecting, logging in, and clicking a few buttons.
Maintaining Your Digital Safety Net: Simple Habits for Ongoing Protection
Setting up a backup is a fantastic first step, but like a garden, it needs a little tending to thrive. Here are some simple habits to keep your digital safety net strong:
Regular Checks: Every few months, take five minutes to make sure your automatic backups (like iCloud or Time Machine) are still running. For external drives, make a habit of plugging them in and copying new files every week or month. Think of it as checking the batteries in your smoke detector.
Password Management: Strong passwords are your first line of defense. Use unique, complex passwords for important accounts (especially your backup services!). A password manager can help you remember them all. And if a service offers Two-Factor Authentication (2FA), turn it on! It’s like using two locks on your door instead of one.
Recognizing and Avoiding Common Scams: Backups protect you from accidental loss, but scams can still trick you into giving away your data. Be wary of suspicious emails, texts, or calls asking for personal information or urgent action. Remember, legitimate companies rarely ask for your password via email. We have a great article on how to spot fake news that can help you hone your scam-spotting skills.
Dealing with Limited Free Storage: Those free cloud storage tiers can fill up quickly, especially with photos. If you hit a limit, you have choices: delete old, unnecessary files; upgrade to a paid plan; or consider a privacy-focused option like Proton Drive for your most important data.
FAQs for Seniors: Answering Common Questions & Building Confidence
We know you might have a few more questions swirling around. That’s perfectly normal! Here are answers to some common concerns:
Do I need to back up everything?
No, not necessarily! Focus on irreplaceable data. Your operating system (Windows or macOS) and programs can usually be reinstalled. What you absolutely want to protect are your personal photos, videos, documents, and unique settings. If you’re not sure, it’s better to back up more than less.
Is the cloud truly safe from hackers?
No system is 100% hack-proof, but reputable cloud services use strong encryption and security measures. The key is to use strong, unique passwords and Two-Factor Authentication (MFA) for your cloud accounts. Services like Proton Drive offer end-to-end encryption, meaning even if a hacker accessed their servers, your files would be unreadable, adding an extra layer of peace of mind.
How often should I back up?
Automatic Cloud Backups (iCloud, Google, Time Machine): These usually back up continuously or daily when conditions are met (power, Wi-Fi, locked). So, once set up, you mostly don’t have to worry.
Manual External Drives: This depends on how often you create new, important files. If you’re frequently taking photos or working on documents, weekly might be best. If your digital life changes less often, monthly could be fine.
What if I get a new phone/computer?
This is where your backup really shines! When you set up a new device, it will prompt you to restore from a backup. For phones, log in with your Apple or Google ID. For computers, connect your Time Machine drive or external backup, or log into your cloud service. It makes the transition surprisingly smooth, bringing your digital life along with you.
Creating a digital safety net isn’t just about protecting files; it’s about protecting your memories, your peace of mind, and your ability to stay connected and independent in the digital world.
By understanding your options and taking these simple steps, you’re not just backing up data; you’re safeguarding your digital legacy for years to come.