Enter your email address below and subscribe to our newsletter

backing up iphone photos and videos

Don’t Let Your Memories Vanish: A Guide to Backing Up Your iPhone Photos

backing up iphone photos and videos

Have you ever experienced that heart-stopping, stomach-lurching moment when you can’t find a specific photo on your phone?

You know the one—your granddaughter’s first toothy grin, that sunset from your trip to the Grand Canyon, or the blurry-but-perfect shot of the whole family laughing at Thanksgiving.

You scroll, you sweat, you start questioning reality.

Did you dream it? Was it on your old phone? Did a tiny digital gremlin sneak in and eat it?

Losing a digital photo feels like losing a piece of your history. It’s the modern-day equivalent of a house fire taking all your old photo albums.

The good news is, unlike a shoebox of prints in the attic, your digital memories can be made nearly indestructible. You just need a good backup plan.

Now, before your eyes glaze over at the word “backup,” stick with me. This isn’t about complex computer wizardry.

Think of it as making a few extra copies of your most precious photos and tucking them away in different safe places. We’ll walk you through the easiest ways to do it, step-by-step, with zero technical jargon.

Foundation: Understanding iPhone Backups – The Essentials

Before we start pressing buttons, let’s clear up one of the biggest points of confusion in the tech world.

It’s a misunderstanding that has caused more headaches than a family reunion seating chart. We’re talking about the difference between iCloud Photos and iCloud Backup.

The Big Clarification: iCloud Photos vs. iCloud Backup

You’d think they do the same thing, but they are fundamentally different. Getting this right is the key to protecting your pictures.

  • iCloud Photos is like a magic, self-updating photo album. When it’s on, every photo and video you take on your iPhone is automatically sent to iCloud and then appears on all your other Apple devices (like an iPad or Mac). If you delete a photo from your iPhone, it’s deleted from everywhere. It’s a syncing service designed for convenience.
  • iCloud Backup is like taking a snapshot of your entire phone at a specific moment in time. It saves your settings, app data, and home screen layout. But here’s the crucial part: if you have iCloud Photos turned on, your photos and videos are NOT included in your iCloud Backup. Apple assumes they are already safe in iCloud Photos and doesn’t duplicate them.
An infographic showing the difference between iCloud Photos and iCloud Backup. On the left, iCloud Photos is depicted as a continuous flow of photos syncing between an iPhone, iPad, and the iCloud, with a caption 'Syncs your media across all devices.' On the right, iCloud Backup is shown as a single arrow pointing from an iPhone to iCloud, with a caption 'Saves a snapshot of your device data,' and a note stating 'Excludes photos if iCloud Photos is ON.'

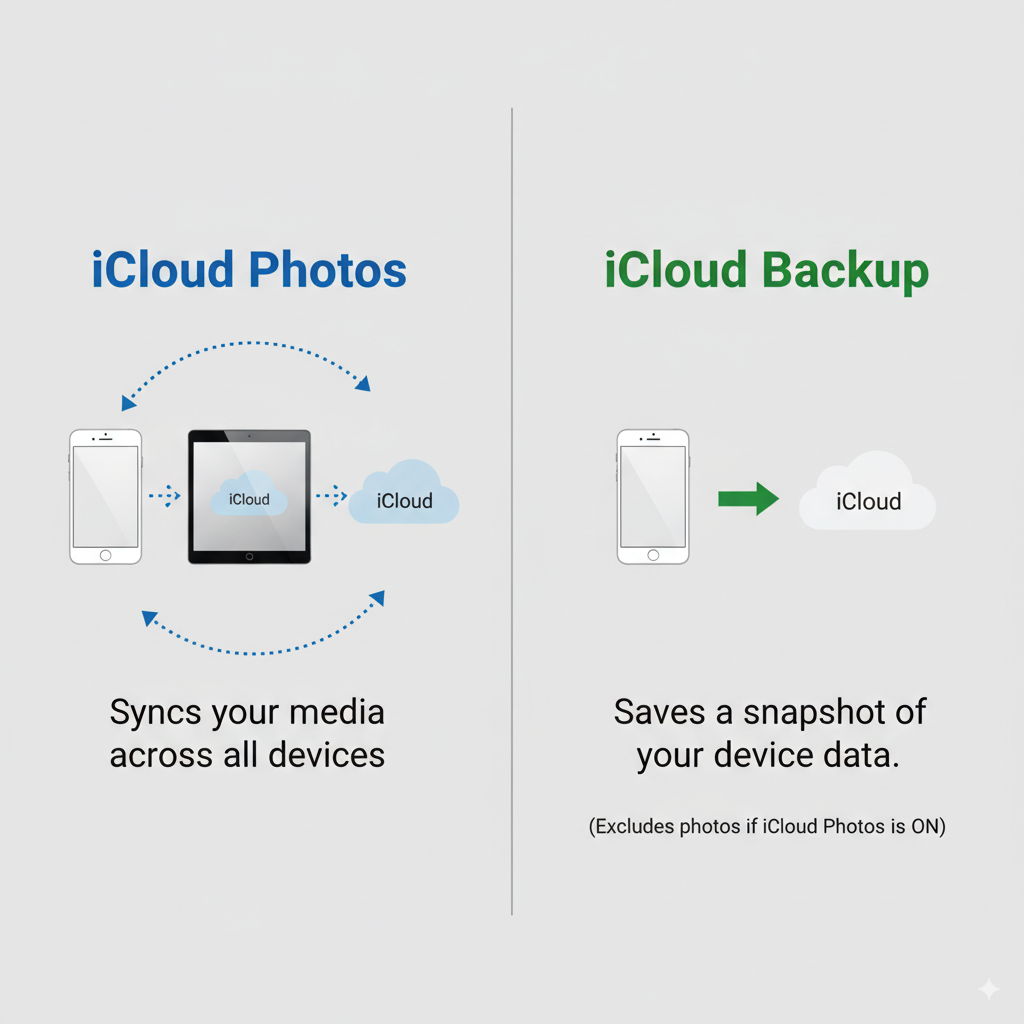
Understanding the critical difference: iCloud Photos continuously syncs your pictures across devices, whereas iCloud Backup saves a snapshot of your device but excludes photos when syncing is on.

This is the “aha moment” for most people. If you thought your iCloud Backup was saving your photos while you were also using iCloud Photos, you might not have the safety net you thought you did.

Your Free iCloud Storage: Is 5GB Enough?

Apple gives every user 5GB of free iCloud storage. In the world of digital photos and videos, 5GB is about the size of a carry-on bag when you need to pack for a year-long cruise. It fills up fast.

If you’re a casual picture-taker, you might get by for a while. But if you love taking videos of your grandkids or have thousands of photos, that 5GB will disappear faster than a plate of cookies. We’ll cover what to do when that happens.

Building: Your Step-by-Step Guide to Backing Up iPhone Photos & Videos

Alright, let’s roll up our sleeves. We’re going to create a system that works for you, whether you want something fully automatic or you prefer a more hands-on approach.

A visual guide with three panels. The first panel shows a finger tapping the 'Photos' setting on an iPhone. The second shows the iCloud Photos toggle being switched on. The third panel displays logos for Google Photos, Dropbox, and OneDrive, representing alternative cloud backup options.

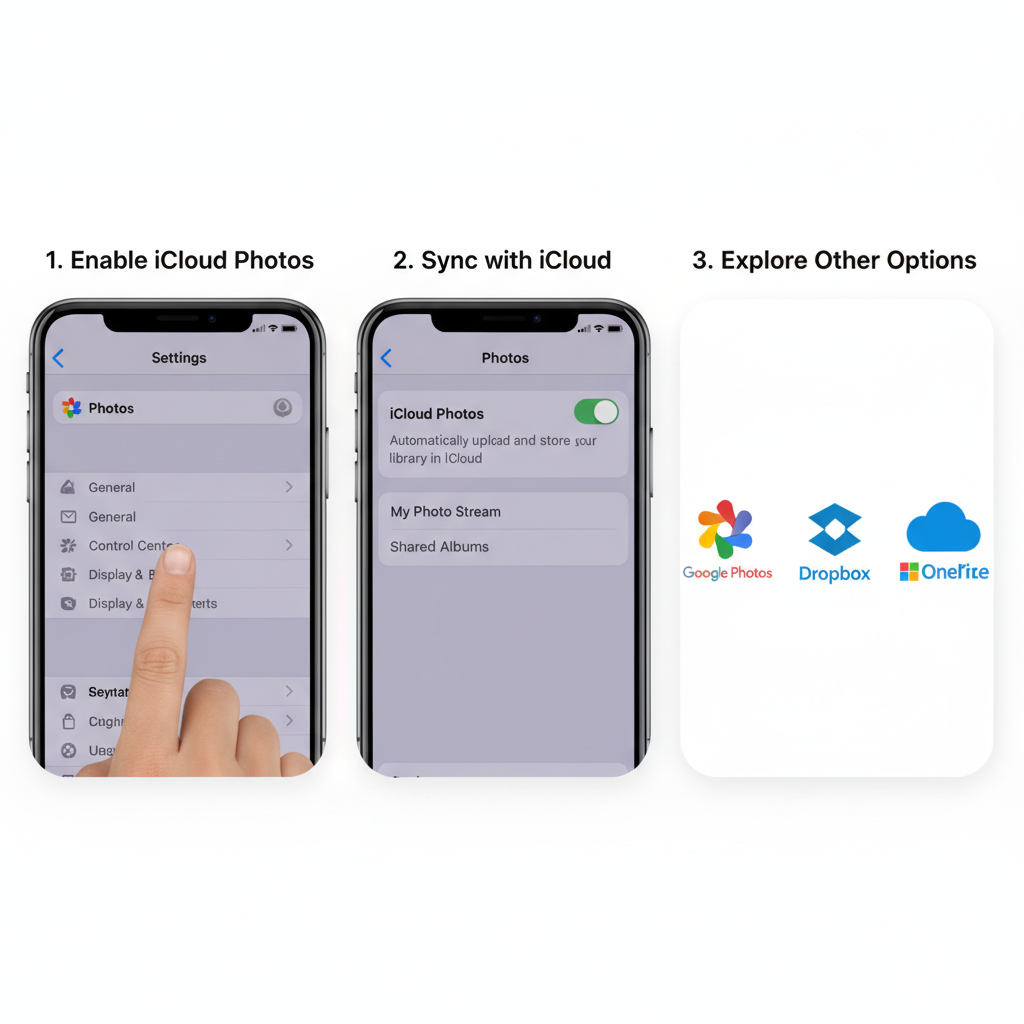
Follow this simple step-by-step guide to set up automatic and alternative backups for your iPhone photos, empowering you with multiple safe options.

Method 1: Automatic Cloud Backup with iCloud Photos

This is the easiest, most integrated way for iPhone users. It’s the “set it and forget it” method.

  1. Open the Settings app on your iPhone.
  2. Tap on your name at the very top.
  3. Tap on iCloud.
  4. Tap on Photos.
  5. Make sure the switch next to Sync this iPhone (or iCloud Photos) is turned on (green).

Here you’ll see two options:

  • Optimize iPhone Storage: This is the best choice for most people. It keeps smaller, space-saving versions of your photos on your phone and the full-quality originals safe in iCloud. You can download the full version anytime you need it.
  • Download and Keep Originals: This keeps the full-quality photos on both your phone and in iCloud. Only choose this if you have a massive amount of storage on your iPhone.

What if my storage is full? You can easily upgrade your iCloud storage. Plans are affordable, usually starting at 99 cents a month for 50GB, which is enough for thousands of photos.

Method 2: Leveraging Other Cloud Services (Google Photos, etc.)

You don’t have to stick with Apple. Other services work great, and sometimes it’s wise not to keep all your eggs in one basket.

  • Google Photos: This is a fantastic alternative. Simply download the Google Photos app from the App Store, sign in with your Google account, and give it permission to access your photos. It can automatically back up every picture you take. Google gives you a much larger 15GB of free storage to start.
  • Dropbox & OneDrive: If you already use these services for files, they also have features to automatically upload your camera roll.

Method 3: Local Backup to Your Computer (The Old-School Way)

For those who like to have a physical copy they can control, backing up to your computer is a rock-solid option. You’re not relying on the internet—your photos are right there on your own machine.

  • For Mac Users: Connect your iPhone to your Mac with its charging cable. Open the Photos app. Your iPhone should appear in the sidebar. Click on it, and you can import all your new photos directly into your Mac’s photo library.
  • For Windows PC Users: Connect your iPhone to your PC. Open the Photos app on your computer. Click Import (usually in the top-right corner) and select your iPhone. You can then choose which photos you want to copy to your computer.

Action: Building Your Bulletproof Photo Backup Strategy

Ready to become a memory-protecting champion? The best strategy is one used by photographers and IT professionals, but it’s simple enough for anyone. It’s called the 3-2-1 Rule.

!A simple graphic illustrating the 3-2-1 Backup Rule. It shows three copies of data, two on different media types (like a cloud icon and a hard drive icon), and one located offsite (represented by a house icon).

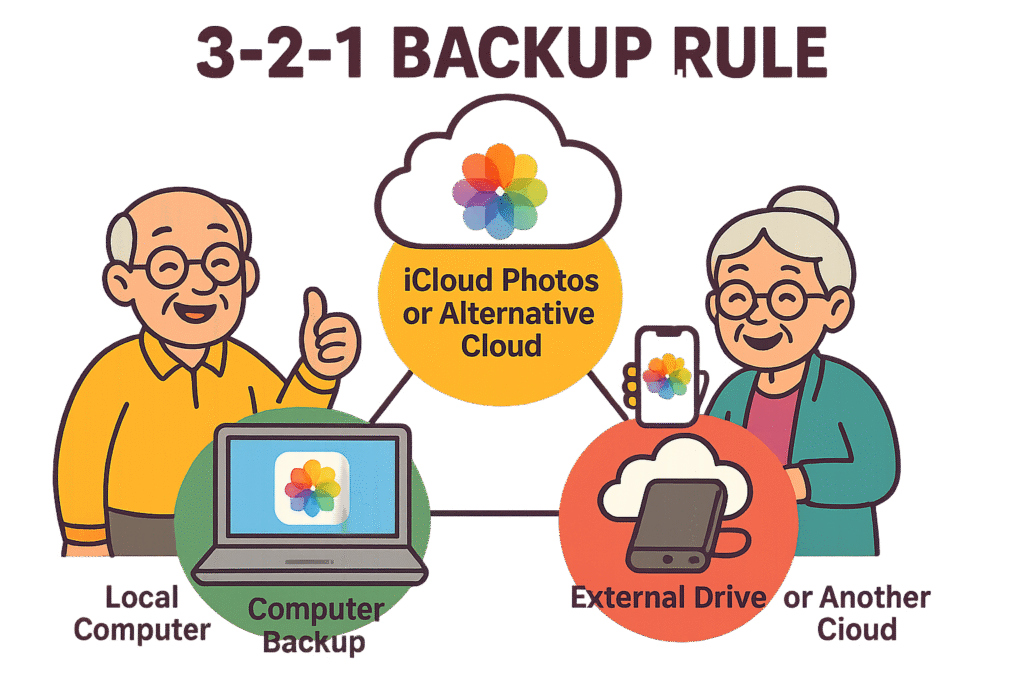
The 3-2-1 Backup Rule made simple: keep three copies of your photos on two different types of media with one kept offsite — a foolproof strategy for peace of mind.

The 3-2-1 Rule for Your Photos

It sounds technical, but it’s a piece of cake:

  • 3 COPIES: Keep three copies of your most important photos.
  • 2 MEDIA: Store them on at least two different types of media (e.g., your phone’s internal storage and a cloud service).
  • 1 OFFSITE: Keep one of those copies offsite (which any cloud service, like iCloud or Google Photos, automatically does for you!).

A simple 3-2-1 plan for you could be:

  1. Copy 1: The photos on your iPhone.
  2. Copy 2: The automatic backup to iCloud Photos or Google Photos (this is your offsite copy).
  3. Copy 3: A monthly backup to your home computer or an external hard drive (this is your second media type).

With this system in place, you’d need a truly epic string of bad luck to lose your photos. You are now officially a memory protector. Your photos are safe, your mind is at ease, and you can get back to making more memories to capture.

Mastery: Troubleshooting Common iPhone Photo Backup Problems

Even the best plans can hit a snag. Here are some common questions and quick fixes.

My photos aren’t uploading to iCloud! What gives?

First, check your Wi-Fi connection. iCloud usually waits until you’re on Wi-Fi to do its heavy lifting to save your cellular data. Also, make sure your phone is charged or plugged in. Big uploads can take time and battery power.

My iCloud storage is full, but I don’t want to pay more.

That’s perfectly fine! Your best bet is to use Method 2 or 3. Turn off iCloud Photos (it will ask if you want to download your photos to your phone first—say yes!) and set up Google Photos or start doing regular backups to your computer.

I deleted a photo from my iPhone, and now it’s gone everywhere. Can I get it back?

This is the iCloud Photos sync trap! When you delete a synced photo, it goes to the “Recently Deleted” album in your Photos app. You usually have about 30 days to recover it from there before it’s gone for good. Go to your Photos app, tap Albums, scroll all the way down, and you’ll see Recently Deleted.

Senior Tech Cafe Team
Articles: 330

Newsletter Updates

Enter your email address below and subscribe to our newsletter

Leave a Reply

Your email address will not be published. Required fields are marked *


Stay informed and not overwhelmed, subscribe now!